This guide shows you how to build and arrange a spooky themed kitchen gadget setup that is both decorative and genuinely usable. You will choose Halloween-themed functional tools, place them so they stay within reach during cooking, and style the surrounding surfaces so the whole kitchen reads as a cohesive haunted space rather than a pile of novelty items.

Get kitchen gear delivered free — and shop member deals
- Fast, free delivery on millions of items
- Access to Prime Big Deal Days deals on October 6–7
- Prime Video, Amazon Music and more included

OTOTO Original Elizabat Kitchen Scissors
- ✔ Brand: OTOTO
- ✔ Model Number: OT022
- ✔ Material: Stainless Steel

OTOTO Batty Bat-Shaped Plastic Cutting Board
- ✔ Brand: OTOTO
- ✔ Material: Plastic
- ✔ Shape: Bat
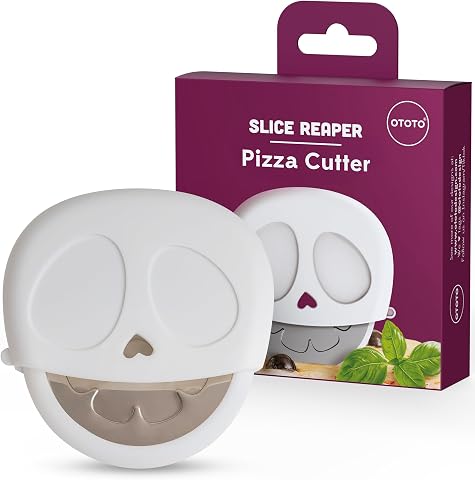
OTOTO Slice Reaper Pizza Cutter Wheel – Skull Design
- ✔ Brand: OTOTO
- ✔ Material: Stainless Steel
- ✔ Design: Skull / Grim Reaper
This guide is for home cooks and Halloween enthusiasts who want a kitchen that looks themed but still functions for everyday meal prep through the Halloween season. No special craft skills are required. The work takes two to four hours once you have your gadgets in hand, plus whatever time you spend shopping.
Difficulty is beginner level. The only skills needed are basic kitchen organization and an eye for arranging objects. By the end, you will have a themed workstation where every spooky item either works as a real tool or supports the overall look.
Difficulty: Beginner | Time: 2-4 hours (plus shopping time)
What You’ll Need
Tools & Materials:
- Spooky themed kitchen gadgets (skull measuring cups, spider web trivets, bat-shaped spatulas, coffin cutting boards, pumpkin or ghost-shaped molds, witch cauldron serving bowls, novelty salt and pepper shakers)
- Clear counter space of at least 3 square feet
- Cleaning supplies (all-purpose cleaner, microfiber cloths)
- Optional: LED string lights in purple, orange, or green
- Optional: black tablecloth or themed runner
- Camera or phone for documenting the final layout
Knowledge:
- Basic kitchen organization principles
- Which kitchen tasks you perform most often (so themed gadgets land where you actually work)
- Food-safe material basics: which items are decorative-only versus safe for food contact
Check every gadget for food-contact safety before using it with food. Many novelty items sold as decorations are not food safe, especially older or imported pieces with paint that can chip or leach. Look for labels reading food safe, BPA-free, or FDA-approved for food contact. If an item is unlabeled painted ceramic or resin, treat it as decorative only and place food in a separate safe container inside or beside it.
Set a budget before shopping. Themed gadgets range from a few dollars to over forty dollars each, and impulse buying is the fastest way to overspend on items you will use three weeks a year.
OTOTO Original Elizabat Kitchen Scissors
Scissors are among the most frequently used tools in any kitchen, and that’s exactly why the Elizabat Kitchen Scissors earn our top spot: the spooky design gets daily exposure rather than gathering dust until October. The stainless steel blades handle meats, vegetables, and herbs with the kind of clean, effortless cutting you’d expect from a conventional pair of shears, which means you’re not sacrificing performance for the bat motif.The ergonomic bat-wing handles deserve particular credit. Compared with the Slice Reaper pizza cutter, whose novelty shape works against grip comfort, this design actually works in favor of it — the wing shape gives your fingers a comfortable, secure purchase during tougher cutting jobs like spatchcocking poultry or trimming raw meat.The tradeoff is real, though. The sculpted shape is harder to store in standard drawers than flat, conventional shears, and the gothic aesthetic will clash with minimalist or farmhouse-style kitchens. If your kitchen decor leans bright and airy, this pair may feel permanently out of place — but if you’re reading a roundup about spooky gadgets, that’s probably not your problem.
Pros:
- Stainless steel blades cut meats, vegetables, and herbs cleanly and effortlessly
- Ergonomic bat-wing handles provide a genuinely comfortable, secure grip
- Versatile enough to replace a standard pair of kitchen shears entirely
- The whimsical design enhances rather than compromises the tool’s function
Cons:
- Themed design clashes with non-gothic kitchen aesthetics
- Sculpted shape doesn’t store as easily in standard drawers as flat shears
Best for: Home cooks who want a daily-use tool with gothic personality and don’t want to compromise on cutting performance
Not ideal for: Households with brightly styled kitchens or anyone who needs scissors to stack flat in a crowded drawer
Bottom line: The Elizabat is the rare novelty gadget you’ll reach for every day, making it the smartest spooky purchase for most kitchens.
“The Elizabat is the rare novelty gadget you’ll reach for every day, making it the smartest spooky purchase for most kitchens.”
OTOTO Batty Bat-Shaped Plastic Cutting Board
Of the three, the Batty Cutting Board delivers the most design-per-dollar cleverness. The standout feature isn’t the bat silhouette — it’s the foldable wings, which curl up to contain crumbs and debris as you chop. That’s a functional innovation most conventional cutting boards don’t offer, and it makes this more than a novelty slab of plastic.The non-slip textured base keeps the board planted on the counter, which matters more for safety than most buyers realize — a sliding board is one of the most common kitchen accidents. Being dishwasher safe also gives it a practical edge over wooden boards, which demand hand washing and periodic oiling.That said, plastic has an unavoidable weakness: it will show knife marks over time, especially with heavy daily use, and wood remains the better material for serious prep work. The bat shape also means an irregular, less efficient cutting surface compared with a standard rectangle. Compared with the Elizabat scissors, which serve as a full-time replacement for a conventional tool, this board is better treated as a fun secondary surface — think cheese boards, appetizers, and smaller prep jobs where the shape becomes a feature rather than a limitation.
Pros:
- Foldable wings actively contain crumbs and debris while chopping
- Non-slip bottom and textured surface keep the board stable during use
- Fully dishwasher safe, making cleanup easier than wooden alternatives
- The bat shape doubles as a serving platter or conversation-piece cheese board
Cons:
- Plastic surface will accumulate knife marks faster than wood
- Novelty shape reduces usable cutting area for larger prep tasks
Best for: Budget-conscious buyers, gift-givers, and anyone wanting a spooky accent board for snacks, cheese, or light prep
Not ideal for: Cookers doing large-scale meal prep who need a full-sized rectangular work surface
Bottom line: The Batty board is the best value in the lineup — it leans into its theme while adding genuinely useful features like crumb-catching wings.
“The Batty board is the best value in the lineup — it leans into its theme while adding genuinely useful features like crumb-catching wings.”
OTOTO Slice Reaper Pizza Cutter Wheel – Skull Design
The Slice Reaper is the loudest personality in this lineup, and that’s precisely its strength and its limitation. Its premium stainless steel blade powers through thick crusts, bread, dough, and cheese with authority, so the grim reaper aesthetic never comes at the cost of cutting ability — a common failure point for novelty pizza cutters.Its smartest feature is the protective blade cover, which addresses two problems at once: it keeps the edge sharp during storage and prevents accidental cuts when rummaging through a drawer. Neither the Elizabat scissors nor the Batty board includes comparable protective thinking, which gives this pick a genuine safety advantage for households with kids.Where it falls short of our top two is versatility and ergonomics. Unlike the scissors, which replace an everyday tool, a pizza cutter is inherently single-purpose — you’ll only justify it if pizza, flatbreads, or homemade dough appear regularly in your rotation. And the skull-shaped body, while hilarious at a party, is less controllable in the hand than a standard straight-handled cutter, particularly when pressing down through a dense stuffed crust. This is the pick we’d recommend as a gift for the goth or pizza obsessive in your life, rather than as your first themed purchase.
Pros:
- Durable stainless steel blade handles thick crusts, dough, bread, and cheese with ease
- Protective cover preserves blade sharpness and prevents drawer injuries
- Made with safe, food-grade materials for direct food contact
- The skull design makes it the most memorable gift of the three picks
Cons:
- Single-purpose tool with far less everyday utility than the scissors or cutting board
- Novelty shape is less ergonomic and comfortable than standard cutter handles
- The niche skull aesthetic won’t blend into every kitchen’s decor
Best for: Gift-givers, Halloween hosts, and pizza lovers who want a dramatic tabletop moment
Not ideal for: Households that rarely make pizza or buyers prioritizing ergonomic comfort over visual impact
Bottom line: The Slice Reaper is the ultimate spooky gift pick — brilliant at its one job, but the least essential purchase for your own kitchen.
“The Slice Reaper is the ultimate spooky gift pick — brilliant at its one job, but the least essential purchase for your own kitchen.”
As an Amazon Associate we earn from qualifying purchases.
Before You Start
Clear and clean the counter zones where gadgets will live. Themed items lose their impact on cluttered surfaces, and clutter also hides your everyday tools. Wipe down counters, clear loose papers and mail, and remove small appliances you rarely use. You want the spooky pieces to be the visual focus, not competitors with a toaster and a stack of coupons.
Decide your theme boundaries now: full haunted house (black, purple, green accents with lots of props) or subtle seasonal (a handful of themed tools among your normal equipment). Mixed intensity looks accidental. Pick one direction and commit to it.
If you plan to serve food from these gadgets at a party, verify each item is washable and food safe before it enters the layout. Setting this standard early prevents a decorative resin skull from ending up filled with snack mix it should never touch.
Step-by-Step Instructions
Step 1: Sort your gadget collection by function
Lay out every spooky gadget you own or have purchased on a cleared table. Sort them into three groups: daily-use tools (spatulas, measuring cups, oven mitts, timers), serving pieces (cauldron bowls, skull plates, pumpkin tureens), and display-only items (unlabeled painted figurines, electric props, decorative signs).
Write a short list of the groups so you remember which items can touch food and which cannot. Tape a small dot sticker on the bottom of display-only items as a permanent reminder.
Tip: Be honest about the third group. If you cannot confirm food safety, it goes there. A themed kitchen loses its charm the moment someone bites into paint flakes.
Check: Every item sits in exactly one of the three groups, and display-only items carry a dot sticker or are listed.
Step 2: Anchor the theme with one focal piece
Choose the single largest or most striking gadget — typically a cauldron serving bowl, a coffin cutting board, or a large skull canister — and place it at the visual center of your main counter, slightly off-center for a natural look. Everything else will arrange around this anchor piece.
Position it at least six inches from the stove edge so it does not obstruct cooking movements or catch heat damage.
Tip: Height creates drama. If your anchor piece is short, place it on a black cake stand or stack of books wrapped in black paper to raise it above the surrounding items.
Check: Standing back five feet, your eye lands on the anchor piece first before any other gadget on the counter.
Step 3: Place daily-use gadgets at your work zones
Distribute the daily-use themed tools to the exact spots where you would normally keep their ordinary counterparts: bat spatulas in the utensil crock by the stove, skull measuring cups in the prep zone, spider web trivets stacked beside the oven, witch oven mitts hanging near the range.
Remove the ordinary versions of these tools from the counter entirely. Store them in a drawer for the season. Keeping both versions out dilutes the theme and doubles counter clutter.
Tip: Group themed tools in odd numbers — three spatulas or five measuring cups looks intentional, while pairs look sparse.
Check: You can complete a normal cooking task, such as stirring a pot or measuring flour, without reaching past non-themed duplicates.
Step 4: Stage the serving pieces for display
Arrange serving pieces on the counter or open shelves in a secondary zone away from the stove: cauldron bowls nested together, skull plates fanned on a stand, pumpkin tureens lined along a shelf edge. Angle each piece slightly toward the room rather than the wall so faces and details are visible.
Leave at least two inches of breathing room between pieces. Crowded spooky items read as clutter rather than curated decor.
Tip: If you have open shelving, put the tallest serving pieces on top shelves and shorter ones below to create a descending visual rhythm.
Check: Each serving piece is fully visible from the main entry point of the kitchen with nothing hidden behind another item.
Step 5: Add themed lighting and background layers
String LED lights in purple, orange, or green along the underside of upper cabinets or along the shelf edge behind the serving pieces. Use small clear adhesive hooks rather than tape so surfaces stay undamaged. Plug into an outlet you can reach easily, ideally one controlled by a switch.
Optional: lay a black runner or lace spider-web fabric on the counter beneath the serving zone to give the arrangement a defined backdrop.
Tip: Warm-colored LEDs (orange, amber) flatter food and skin tones; pure green or blue can make food look unappetizing if you cook under them. Keep colored lighting behind the decor, not over your main prep surface.
Check: With overhead lights off and LEDs on, the serving zone glows visibly and the theme reads clearly from across the room.
Step 6: Position display-only props safely
Place all dot-stickered display-only items on high shelves, windowsills, or the tops of cabinets — anywhere above food prep surfaces. This keeps their non-food-safe materials away from contact with anything edible while still letting them contribute to the atmosphere.
Keep electric props away from the sink and stove, and route any cords along the wall with no crossing pathways.
Tip: One or two display props at height adds depth. More than that and the kitchen starts to feel like a store shelf.
Check: No display-only item sits within one foot of any surface where food is prepared or served.
Step 7: Test the kitchen with a real cooking session
Cook one normal meal using the themed setup exactly as arranged. Use the themed spatulas, timers, and trivets. Note any friction: a tool that is hard to grab, a display item that blocks your elbow, or lighting that interferes with seeing food color on the stove.
Adjust placements based on what you find. Move beauty aside for function every time — the theme should never slow down your cooking.
Tip: This is the step most people skip. Decor that fails a live cooking test will annoy you daily for weeks.
Check: You complete the meal without moving any themed item out of your way and without grabbing a stored-away normal tool.
Step 8: Photograph the layout and record storage plans
Take photos of the finished arrangement from two or three angles. These photos let you rebuild the exact layout next year in minutes instead of starting over.
Write a short note listing where each gadget will be stored after the season: a single labeled bin labeled Halloween Kitchen keeps everything together and prevents losses.
Check: You have at least two clear photos and a labeled storage bin waiting for post-season pack-up.
Common Mistakes to Avoid
- Using unlabeled decorative items for food contact — Verify food-safety labeling on every item before it enters the layout, sticker anything uncertain, and keep all display-only pieces at least a foot from prep surfaces.
- Overcrowding counters with too many themed pieces — Follow the anchor-piece rule: one focal item, a handful of daily tools, and a spaced serving zone. If a new piece does not replace something or fill a real gap, it stays in storage.
- Themed tools replacing functional quality — Test each themed tool once before committing it to the counter. A flimsy novelty spatula that melts near heat belongs in the display group, not the daily-use group.
- Colored lighting placed over the cooking area — Keep LED strands behind serving zones and under cabinets only. Prep and cooking surfaces need neutral light so you can judge doneness and food color accurately.
Troubleshooting
Problem: The kitchen looks cluttered rather than themed
Solution: Remove every third item and add space between what remains. Spooky decor relies on contrast with negative space; if nothing is visible between pieces, the theme disappears. Store removed items and reassess after a day.
Problem: Themed gadgets crowd out everyday cooking tools you still need
Solution: Audit your daily-use group again. Any themed tool without a genuine current function moves to the display zone or storage. Keep chef knives, cutting surfaces, and frequently used utensils in their normal spots regardless of theme.
Problem: LED string lights fall off cabinet undersides
Solution: Replace tape or weak adhesive with small clear utility hooks every 12 to 18 inches. Clean the surface with rubbing alcohol before pressing hooks on so they hold for the full season.
Problem: A themed tool gets damaged by heat or staining
Solution: Remove it from the daily-use group immediately, clean it gently with warm soapy water, and demote it to the display shelf. Replace its function with your stored normal tool so cooking is never compromised.
What Success Looks Like
Your setup is complete when all of the following are true: the kitchen reads as clearly spooky from the doorway on first glance; your anchor piece draws the eye before any other item; you can cook a full meal using only what is on the counters without friction; every food-contact item carries a food-safety label or known safe material; no display-only piece sits near food surfaces; and you have photos plus a labeled bin for next year. If a guest walks in and comments on the theme before noticing anything else in the room, the layout worked.
Next Steps
Once the layout is done, plan one themed cooking session — Halloween cookies cut with skull cutters, punch served from the cauldron bowl, or snacks plated on the skull sets — so the gadgets earn their place through actual use. Mid-season, wipe down handled tools and re-clean anything used with sticky ingredients. After Halloween, pack everything into the labeled bin within a week while you still remember the layout, using your photos as a packing guide. Shop next year’s additions during post-Halloween clearance sales in the first week of November, when themed gadgets often sell at half price. If you host a party, do a second live test with guests present: notice which pieces they pick up, comment on, or ignore, and prioritize that feedback when planning next year’s arrangement.
Frequently Asked Questions
How many spooky gadgets should I keep out at once?
Aim for one anchor piece, five to eight daily-use tools, and three to five serving pieces for a standard kitchen. Going beyond that number usually creates clutter that hides the theme instead of building it.
Are novelty kitchen gadgets dishwasher safe?
Only some are. Check the bottom or packaging for dishwasher-safe symbols. Hand-painted ceramics, resin pieces, and anything with glued-on details should always be hand washed with mild soap, even when the base material seems durable.
Where is the best place to buy spooky kitchen gadgets?
Seasonal sections of home goods stores, specialty kitchen stores in October, and online marketplaces carry the widest range. For value, shop clearance sales in the first week of November, when prices often drop by 50 percent or more.
Can I leave a themed setup out year-round?
You can, but most people find rotating seasonal decor keeps it fresh. If you love the aesthetic year-round, choose a subtler gothic style — black utensils, skull canisters, dark textiles — that reads as a design choice rather than a holiday display.
How do I keep themed gadgets from taking over my counter space?
Assign every item a specific zone before it goes out: prep zone, serving zone, or high display shelf. When a zone is full, new items must replace something already there rather than add to it. Enforce the rule during shopping trips too.
Evergreen bestsellers Picks
bestsellers
As an affiliate, we earn on qualifying purchases.