
TL;DR
Acoustic dampening in small spaces isn’t just about foam — it’s about placement, sealing gaps, and ventilation. Putting your rig in a closet can cut noise dramatically, but you must manage heat and leaks carefully for a quiet, safe setup.
Ever tried recording vocals in a tiny closet? It’s a love-hate relationship. You get a tight, focused sound but also face booming bass and heat traps. The secret isn’t just cheap foam or blankets — it’s smart placement, effective dampening, and ventilation.
This guide breaks down how to turn your small space into a quiet, productive zone. Whether you’re chasing better recordings or just want peace from a noisy rig, you’ll find real, actionable tips here.
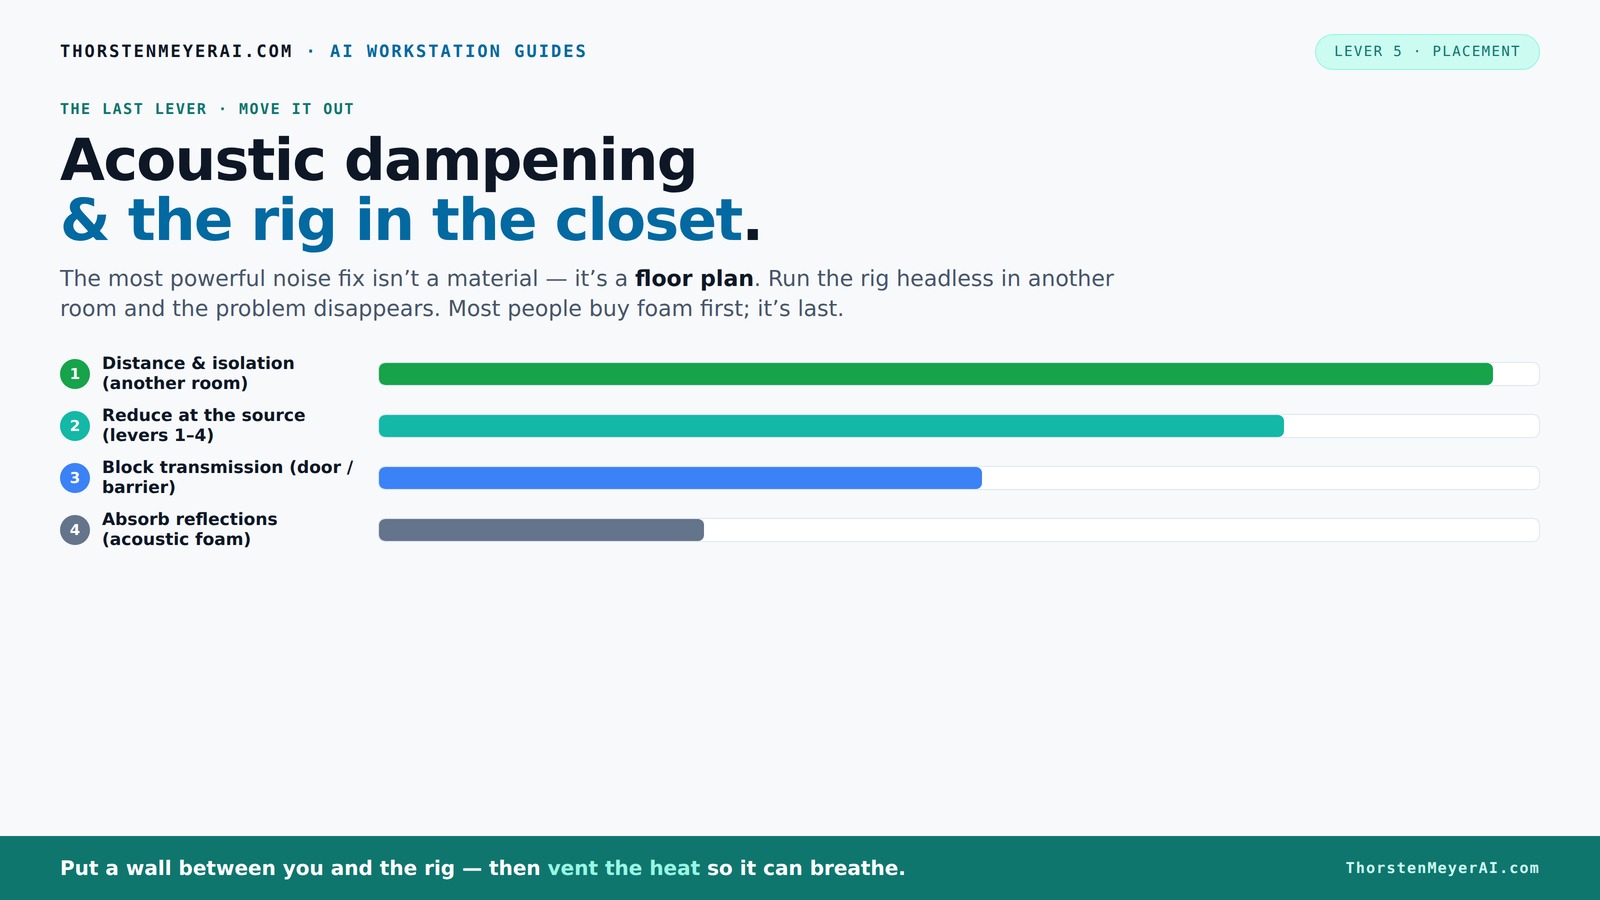
Acoustic dampening
& the rig in the closet.
The most powerful noise fix isn’t a material — it’s a floor plan. A rig you can’t hear because it’s in another room beats any amount of foam. Tap the approaches in Part 1 to see what actually works.
(another room)
(levers 1–4)
(door / barrier)
(acoustic foam)
Contain the noise, not the heat
Key Takeaways
- Moving your rig to another room or closet is the single most effective way to reduce noise without spending a dime.
- Ventilation is critical in closet setups; sealed spaces trap heat, risking overheating and throttling.
- Treat primary reflection points: walls behind the mic, ceiling, and side walls, with thick, layered absorption for clearer vocals.
- Sealing gaps around doors and openings can cut sound leaks dramatically — don’t overlook this step.
- Choose microphones suited for small rooms; dynamic mics tend to handle reflective environments better than condensers.

Focusound 52 Pack Acoustic Foam Panels 1" x 12" x 12" Sound Proof Foam Panles Soundproofing Noise Cancelling Wedge Panels for Home Office Recoding Studio with 300PCS Double-Side Adhesive
Soundproofing - Acoustic foam panels triangular grooves structure for better noise absorption, helps to reduce and absorb unwanted...
As an affiliate, we earn on qualifying purchases.
As an affiliate, we earn on qualifying purchases.
Why Moving Your Rig Is the Easiest Way to Silence It
The best way to cut noise? Put the rig somewhere else. A different room, a closet, even a basement.
Think about it: if your AI workstation lives behind a wall or in a closet, the noise simply stops bothering you. It’s like leaving the noisy neighbor’s car engine running in another street — you don’t hear it. For voice work, your mic and speakers are usually far from the rig, making this the most effective fix.
All you need is a wired or solid wireless connection and proper ventilation. Done right, your workspace stays silent, and the rig roars in peace.
closet soundproofing kit for vocals
As an affiliate, we earn on qualifying purchases.
As an affiliate, we earn on qualifying purchases.
The 'Rig in the Closet' Setup — How to Do It Right and the One Big Trap
Putting a high-power machine in a closet sounds perfect — it muffles noise and keeps the workspace quiet. But there’s a catch: heat. A sealed closet with a 600W GPU running full tilt will heat up fast, risking overheating and throttling. Check out this guide for detailed ventilation tips.
The trick? Ventilation. You need active airflow — a vent, a quiet exhaust fan, or a duct system. Many commercial soundproof cabinets combine acoustic foam with thermostatically controlled fans to keep things cool and quiet.
For DIY setups, consider adding a small exhaust fan and a vent hole. Even a simple, passive vent can help prevent heat buildup. Check out [this guide](https://thorstenmeyerai.com/reduce-heat-noise-ai-workstation/) for detailed ventilation tips.
Beyond just cooling, proper ventilation prevents the buildup of heat that can cause hardware to throttle, which in turn affects performance and stability. Balancing noise reduction with effective airflow is a tradeoff: too much airflow can introduce noise, so selecting quiet fans and designing duct paths carefully is critical. This ensures your rig remains cool without compromising your soundproofing efforts.

Portable Recording Booth for Home Studio, Foldable Sound Isolation Vocal Shield with Floor Stand, High-Density Acoustic Blanket Enclosure for Singing, Voiceover & Podcast, Includes Phone Holder
INSTANT STUDIO-QUALITY "DRY" SOUND: Transform any noisy room into a professional vocal booth instantly. Engineered with high-density acoustic...
As an affiliate, we earn on qualifying purchases.
As an affiliate, we earn on qualifying purchases.
How to Position Acoustic Treatment for a Closet Voice Booth
Start with the mic. Decide where your voice will be. Usually, the wall facing the mic is the main reflection point. Place absorption materials there first.
Next, treat the side walls and ceiling. Use foam panels, blankets, or acoustic blankets to absorb early reflections — the echoes that cause boxiness or muddiness.
For the floor, a rug or soft covering helps reduce reflections. The goal: smooth out sound waves, so vocals come out clear and warm, not echoey or hollow.
Remember, about 2–3 inches of space between the blanket and the wall allows better absorption. Check out [these tips](https://www.soundassured.com/blogs/blog/turning-a-closet-into-a-vocal-booth-the-benefits-and-drawbacks-of-small-spaces) for detailed placement advice.

TroyStudio Portable Vocal Booth, Large Foldable Microphone Isolation Shield, Music Recording Studio Sound Echo Absorbing Box, Desk & Stand Use Reflection Filter with Thickened Dense Acoustic Foam
【BASIC INFO】: Inside size after setup: 8'' (L) X 10'' (W) X 12'' (H), large space for various...
As an affiliate, we earn on qualifying purchases.
As an affiliate, we earn on qualifying purchases.
Sealing Gaps and Blocking Sound Leaks — Why Doors Are Weak Points
Sound leaks through cracks, gaps, and doors. The biggest leaks are often the door itself. Weatherstripping, acoustic sealant, and draft stoppers can plug these gaps effectively.
For closets, hang a thick blanket or acoustic curtain over the door. It’s a quick fix that muffles sound and prevents leaks.
Check for cracks around hinges or frames and seal them with foam weatherstripping or acoustic caulk. These small steps make a big difference, especially when you’re trying to keep noise inside or outside.
Sealing gaps is crucial because even tiny openings can significantly diminish your soundproofing efforts. Gaps allow sound waves to escape or enter, undermining your entire setup. Using high-quality sealants and ensuring a snug fit for doors and panels reduces the risk of leaks, ensuring your recordings stay clean and isolated from external noise sources.
For more on sealing techniques, see [this guide](https://www.soundproofcow.com/how-to-soundproof-closet/).
Choosing the Right Absorption Materials — Foam, Blankets, or Panels?
Acoustic dampening isn’t just about foam. Thick panels absorb more low frequencies, reducing boomy, muddled vocals. Thinner foam is better for high-frequency echo control. Check out this comparison of different materials for advice on choosing the right treatment.
In small closets, layering helps: combine foam panels, moving blankets, and even soft furniture or rugs. About 2–3 inches of thick material makes a noticeable difference. For detailed placement advice, see this guide.
Blankets are cheap, flexible, and easy to hang. For a DIY booth, layering blankets on walls, door, and ceiling works wonders.
Choosing the right materials involves understanding their frequency response. Thick, dense panels excel at controlling bass and low midrange problems, which are common in small, reflective spaces, while lighter foam targets higher frequencies. Combining multiple materials allows you to tailor the acoustic environment, balancing absorption across the spectrum. The tradeoff is cost and complexity — layering more materials improves sound but requires more effort and space.
Check out [this comparison](https://thorstenmeyerai.com/low-noise-pc-cases-airflow/) of different materials for advice on choosing the right treatment.
Do You Need Bass Traps in a Tiny Closet? Yes or No?
Small closets often have standing waves and bass buildup because of parallel walls. Bass traps in corners can help, but they’re not always a magic fix. Proper bass management involves understanding room modes and how sound interacts with your space. Learn more at this site.
Sometimes, thick wall coverage with absorption panels does more. Focus on treating the main reflection zones first, then add bass traps if low-end still booms.
In many cases, strategic placement of thick panels near the mic and in corners manages bass better than just trapping in corners.
Proper bass management involves understanding room modes and how sound interacts with your space. In tiny closets, placing thick absorption on the main reflection points reduces the overall bass response, making traps in the corners less critical. However, if low-frequency issues persist, employing bass traps in the corners can help reshape the room’s bass response, reducing muddiness and improving clarity for recordings.
For more on bass trapping, see [this detailed guide](https://thorstenmeyerai.com/low-noise-pc-cases-airflow/).
Choosing the Best Mic for a Small Closet — What Works?
Small spaces demand a mic that handles proximity effect well and doesn’t exaggerate room echoes. A cardioid condenser or dynamic mic is usually best.
Condenser mics capture detail but can pick up room reflections. Use a close-mic technique and pad or low-cut filter to reduce boominess.
Dynamic mics like the Shure SM58 are tough, reject room noise, and are perfect for tiny, untreated spaces. They’re also less sensitive to room acoustics.
Picking the right mic makes a big difference, especially when treatment is limited. Consider mics with tighter polar patterns and lower sensitivity to room acoustics to minimize reflections and room noise. Experimenting with mic placement—keeping the mic close and aimed away from reflective surfaces—can significantly improve sound quality in small, untreated spaces.
Check out [this discussion](https://www.youtube.com/watch?v=hEAO9OaPIRE) for detailed mic advice.
Common Mistakes to Avoid When Setting Up a Closet Studio
Don’t rely solely on foam — it’s not enough. Over-sealing doors without ventilation leads to heat build-up. Parallel walls create bass issues. And rushing to hang blankets without mic placement can make recordings muddy.
Always treat the main reflection points first. Seal gaps, but keep airflow. Use thicker materials for bass. And position your mic carefully to avoid capturing noise and room effects.
Remember, small spaces are tricky but manageable. The right combination of placement, absorption, and ventilation makes all the difference. Neglecting proper ventilation can lead to overheating, which risks damaging your equipment and degrading performance. Rushing headlong into treatment without understanding the room’s acoustic properties can result in subpar sound. Carefully balancing absorption, diffusion, sealing, and airflow ensures a functional, high-quality setup.
Frequently Asked Questions
How do I make a closet sound good for vocals?
Start by placing the mic in the right spot, treat the main reflection points with thick absorption, and seal gaps around the door. Use blankets or foam on walls and ceiling, and add a soft rug to reduce floor reflections. Proper mic choice and placement make a big difference.Where should I place acoustic panels or blankets in a closet booth?
Focus on the wall behind the mic, the ceiling above, and the side walls. Hang panels 2–3 inches off the wall for better absorption. Cover the door with a thick blanket or acoustic curtain to prevent sound leaks.Do I need corner bass traps in a closet studio?
Bass buildup can happen even in small rooms. While corner traps help, prioritizing thick absorption panels on walls and in the reflection zones often manages bass better than just trapping in corners.How thick should the acoustic treatment be?
Aim for at least 2 inches of thick, dense panels or blankets. Thicker materials absorb lower frequencies and reduce boominess, especially important in small, reflective spaces.How do I stop sound from leaking through the closet door?
Seal gaps with weatherstripping or acoustic sealant. Hang a thick blanket or acoustic curtain over the door. Improving door seals greatly cuts down on sound leaks and keeps your recordings cleaner.Conclusion
Quiet, focused recordings in small spaces require more than just foam and blankets. Proper placement, sealing gaps, and managing heat turn a cramped closet into a professional-sounding vocal booth.
Think of your closet as a tiny concert hall — treat the walls, seal the leaks, and add ventilation. The result? Better recordings, less noise, and a space that feels like a real studio, even in the smallest corner of your home.